
Solid backing, as mentioned in a previous post, has several advantages when used in a stone bridge. Commonly, the backing simply consists of fill thrown in behind the arch, which is held in place with the spandrel walls. Solid backing consists of masonry laid directly against the arch, the entire width of the bridge. One way to view solid backing is as a continuation of the spandrel walls, making the spandrel walls one single, solid unit the entire width of the bridge, as opposed to a pair of retaining walls holding in loose rubble.
In practice many bridges were built with well-cut mortared spandrel walls and looser, mortarless stone backing behind the arch, with little to no masonry bonding between the spandrels and solid backing.
Spandrels, Solid Backing, and Rigidity
The spandrel walls and solid backing both contribute a certain rigidness to a stone arch bridge. The arch can, actually, flex and arch stones can shift under loads, but the solid masonry mass of the spandrel walls and backing greatly hinders this. On the other hand, loose fill is far less rigid than solid masonry. Thus, the arch can flex and shift when backed with loose material. Granted, the sheer weight of the fill will press down against the arch, resisting movements, but the fill still will allow for movement of the arch. It is worth mentioning that the actual movements of a stone arch under safe loading conditions are not a real problem. These movements are small, and often measured in millimeters. Only under overload conditions do these movements become large enough to cause structural problems.
The Tension Problem
Within reasonable limits, the arch can move and flex with impunity; this is not a concern. What can cause problems, however, is the uneven rigidity of a stone arch bridge that uses loose fill held in by spandrel walls. The spandrel walls are rigid, while the fill is not. This combination can and periodically does lead to a rather extreme structural problem in which a section of the arch on which the spandrel walls are resting breaks off completely from the rest of the arch.

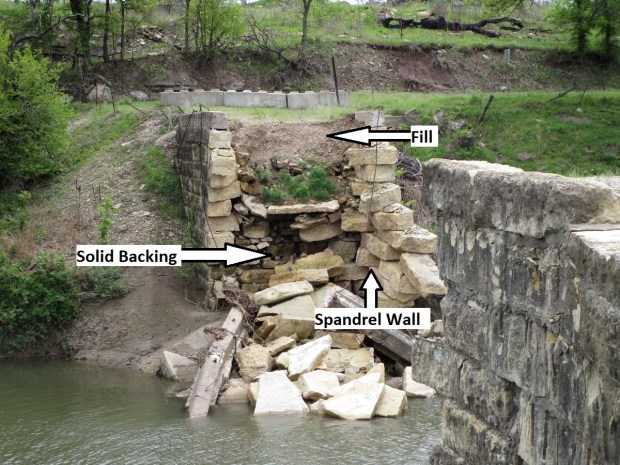
The end result is a narrow and precarious strip of arch supporting the retaining walls while the load-bearing part of the arch is free to flex and move under traffic independently of the spandrel walls. Basically, any type of cracking like this is caused by tension in the arch. Stone masonry, being weak in tension, will tend to break along lines of tension. Thus, if the middle of the arch is flexing freely under heavy loads, while the ends of the arch are rigidly held in place by the spandrel walls, it is not surprising that a failure can occur at the point where the loose fill ends and the spandrel walls begin. Furthermore, if the spandrel walls are not heavy enough to hold the fill, regardless of other loading conditions, spandrel walls can slide out over time. If this happens, the spandrel walls exert a tension on the ends of the arch, and can, over time, break off the portion of the arch on which they rest, as seen in the photo above. Solid backing tends to eliminate these problems, as this stone masonry, even if a poorer grade than that of the spandrels, acts much more rigidly than fill and does not exert the kind of horizontal forces fill does.
Click here to see Part 2 of this series.
