
Limestone is an outstanding, common building material. Found in hillsides, it is very easy to quarry with feathers and wedges. Having recently had opportunity to quarry an extensive amount of limestone from a hillside for a stone bridge project, we found several tips that make the splitting process easier. Even for those buying their stone, most of these tips will be relevant. Please be aware that, while these tips may work for other types of stone, the fact is every type of stone is different and will likely require slight alterations to the method outlined here.
The Layers
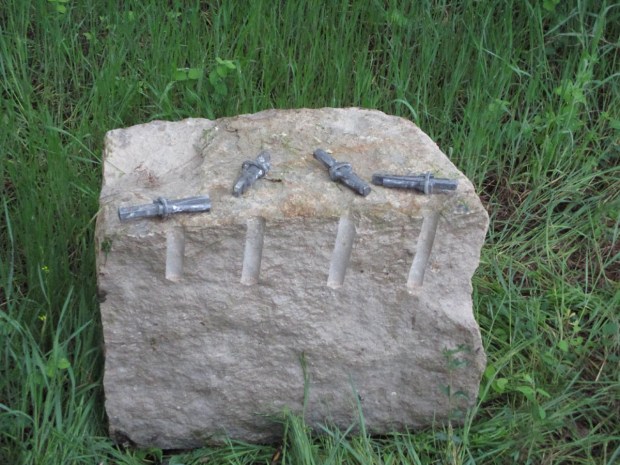
Limestone naturally comes in clearly defined horizontal layers. Vertical seams define how big of a piece will be split off at once, for the stone will have to be split off between these seams. The horizontal layer defines how thick a piece will come out, and defines how large the feathers and wedges have to be. Feathers and wedges can split off about 4 times their total length easily, but they can do larger pieces in some cases. How long the feathers and wedges are determines how wide they are and hence how large the drill holes will be.
Spacing the Feathers and Wedges
The feathers and wedges are often spaced about 6 inches apart when quarrying limestone. For thin pieces with relatively large wedges, they can be spaced up to a foot apart. When drilling the holes, if a soft spot is encountered where the drill just slides in very easily bringing out rotten stone dust (which tends to be wet, clayey, and dull in color), it will be necessary to tighten the spacing between the feathers and wedges to ensure enough force is applied to the stone.
Long Wedges
Softer stones, such as limestone, split better if the wedges in the feathers-and-wedge sets are relatively long compared to the feathers. This is because, as the sets tighten, some of the stone will crush in the holes, which means the wedges will have to be driven in farther to achieve the split, the crushing effectively making the hole larger. Larger diameter sets often have a range of hole sizes that can be drilled; for limestone go with the smaller hole size. We used a 1″ set advertised for granite. However, a 1″ hole was too large for limestone due to crushing, so we switched to a 7/8″ hole, and the feathers and wedges now split limestone perfectly. The key to sizing is to shove the wedge in till it is about level with the bottom of the feathers, then measure the width and go with a drill bit as close to that size as you can find.
Drilling the Holes
Surprisingly, we found that deeper holes made worse cuts. We found that the hole depth should be about equal to the total length of the wedge. When in doubt, experiment with different hole depths to find what works the best for your specific type of stone. Harder stones may do better with deeper holes than described above.
Splitting the Rock
Feathers and wedges are tapped in gradually down the line. Start at one end, and work down to the other end, then repeat. We found that the size and type of hammer is important to the success of the splitting. The hammer should be relatively light; we use 3 pounds. The hammer should have a wood handle. We found a fiberglass handle is stiff, and tends to apply a harder impact that tends to shatter the stone around the wedges rather than split it all the way through. The wooden handle gives some bounce, reducing impact as the wedges firm up, while setting up a vibration that helps split the stone. When hammering in the wedges, use the lightest amount of force possible to use while still driving the wedges in. If the wedges lock up, let the stone rest for a few minutes, giving it time to pull apart internally, then continue. Once the stone splits, we find it helpful to drive one or two of the sets in all the way to widen the gap, freeing the other feathers-and-wedge sets and also making it easier to remove the now split stone.
