
Even though it is entirely possible to build a stone arch bridge without cutting a single stone, provided enough quality stones are available to choose from to find a good fit, sooner or later it will likely become necessary to cut some rock, at least roughly. A rough cut is usually done with either a bricklayer’s hammer or waller’s hammer, and is often quite sufficient. Beyond rough-cutting, however, stonecutting becomes a bit of a challenge. Traditionally, stonecutting was something of an art in and of itself. Stonecutting takes practice, and cannot be learned without hands-on experience. Modern stonecutting saws can make the job much simpler, yet stone saws do have their limitations, and can be expensive. Furthermore, in some cases, it is actually quicker to use chisels instead.
Tools
The basic tools for a stone mason vary depending on the work to be done. Stonecutting obviously requires safety goggles and gloves, and probably a long-sleeve shirt, as flying pieces of stone are a regular hazard, and if you miss a chisel you’re liable to pound your hand or arm instead. Stonecutting, beyond a rough trimming, is, obviously, not a task for the faint-hearted. The most universal of stonecutting tools are the bricklayer’s hammer and the waller’s hammer, both used for rough cuts. For more precise cuts, a small hammer, often a small sledge hammer, is required to hit chisels, and a basic flat-blade chisel and point to cut the rock. The point is, as its name suggests, a chisel ending in a sharp point as opposed to a blade. Other useful tools are toothed chisels, wedges and shims (with a drill to create the holes to put them in), and a pickax.
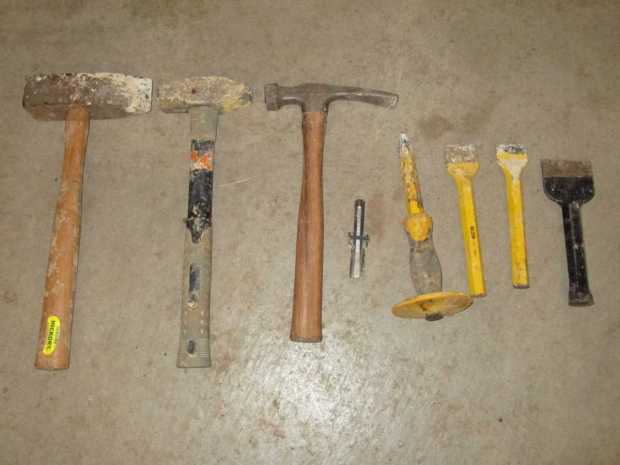
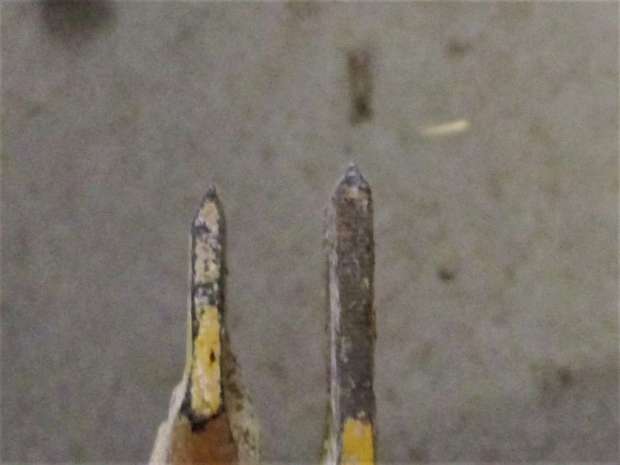
A valuable type of chisel to have is one where the blade is not formed to the traditional pyramidal point, but rather ground with a fairly flat edge and fairly gently sloping edge. Such a chisel is great for splitting stone along its strata, and smoothing off surfaces.
Stone Types
There are many types of rock which can be readily used for masonry. One fact that is sometimes is overlooked is that the type of rock often determines how the stone is to be cut. For instance, most grades of sandstone are easily cut by systematically chiseling with a plain chisel back and forth along the desired line of cut until the stone splits, often quite cleanly, just about exactly where desired. If you try to use the above method on limestone, you may get good results, but, also likely, the stone will break in some apparently random and undesirable direction. Each stone has its own way it wants to be cut. As we only have hands-on experience with several grades of sandstone and limestone, as well as with hard flint, we will limit our detailed discussion to those stones. Please note that there are more ways to cut stone than listed below; these examples are representative of various methods we have tried.
Limestone
Limestone is, historically, a favorite with masons. While hard, it is not so hard that it can’t be cut reasonably easily. Like most rock, limestone falls into several grades. Chalk, such as seen in the famous chalk outcrops in western Kansas, is very easy to cut. It is soft enough that the cutting end of a bricklayer’s hammer can rather easily trim it up. However, chalk is not the best grade of limestone by any means; its softness tends to mean that it deteriorates fairly quickly.
Dolomite is a favorite limestone, for it is much harder and tends to resist the elements more than most stones. Coarse trimming of large pieces is best done with the blunt edge of a waller’s hammer. A little practice makes trimming with this method easy. Essentially, any protuberances to be knocked off are hit close to the face of the rock, knocking them off fairly cleanly. A bricklayer’s hammer can be used to do this on a smaller scale. More exact smoothing of hard limestone like dolomite can be done with the point to knock off protuberances by placing the tip of the tool at the base of the piece of stone to be removed. A regular chisel can also be used for this, but smoothing works best with the specially ground blade (see photo above). Precise smoothing of hard limestone is best done after a coarser finishing. A toothed chisel is ideal for this. For very precise finishes the surface of the stone is often pockmarked using the pointing tool, and then carefully broken off with a chisel. The pockmarks, if driven down to the desired level, help guide where the surface of the stone will break off. This is very time-consuming and takes practice. For most projects such precision is not necessary.
To rough-cut limestone the waller’s hammer can be used to break off pieces. The blade of the waller’s hammer can help score a line for the stone to break along, finishing the cutting with the blunt end of the hammer. A toothed chisel, if used with care, can be used to cut limestone along a line. For small cuts where precision is not required, careful cutting with the sharp edge of a bricklayer’s hammer will usually work. One of the most successful ways of cutting limestone, especially on a large scale, is with wedges and shims. To use wedges and shims a series of holes is drilled along the line of the desired cut. The the wedges and shims are inserted into the holes, with the shims placed one on each side of the desired line of cut with the wedge in the middle. By lightly and evenly tapping the wedges in on all the feathers-and-wedge sets, a surprisingly exact cut can be made. Further smoothing of the cut can be done as described above.
Sandstone
While wedges and shims can be used to cut sandstone, most sandstone can be easily cut simply by running a regular chisel evenly up and down the desired line of cut, hitting it reasonably softly. The sharp edge of a bricklayer’s hammer is also great for trimming angles and other features into sandstone, though if the stone is too thin it may break. The sharp edge of a waller’s hammer can also be used to cut sandstone, but the results tend to be somewhat mixed. Sandstone rarely needs to be smoothed; however, should smoothing be necessary it can be done with a chisel, especially the specially ground chisel shown above. A bricklayer’s hammer can also quickly smooth sandstone. Sandstone is one of the easiest stones to work with. Quartzite is a grade of sandstone much harder to work with, being much closer to flint in consistency than most sandstones.
Flint
Quite frankly, cutting flint is something best avoided. Besides being incredibly hard on tools, especially dangerous due to flying debris, and a bit of a fire hazard, cutting flint usually results in shattering the stone as opposed to cutting it. While some very coarse trimming may be done with the blunt edge of a bricklayer’s hammer, any kind of precise trimming of flint seems to be nearly impossible. Flinty limestones can be trimmed after a fashion similar to dolomite, but the more flint the harder the cut is to make. Wedges and shims can theoretically be used on flint, but drilling the holes is sure to be a nightmare. If flint must be used in a masonry project, it is best to use pieces already close to the desired shape, for cutting flint usually ends badly, and also is incredibly hard on your tools.
